Installing CUDA in Windows 10
The following has to be installed for CUDA 8.0
1. Windows 10
2. Cuda capable GPU
3. Visual studio community 2015
4. NVIDIA GPU toolkit
Procedure:
step 1 : Verify you have CUDA capable GPU through display adapters section in the windows device manager. The windows device manager can be opened via "Run" command in the start menu and type "control /name Microsoft.DeviceManager".
step 2 : Download the NVIDIA toolkit (exe-local) and run the toolkit.
The CUDA toolkit installs the CUDA driver and tools needed to create, build and run a CUDA application as well as libraries, header files, CUDA samples source code, and other resources.
step 3 : read the release notes available in the path to know where the subpackages are installed.
C:\Program Files\NVIDIA GPU Computing Toolkit\CUDA\v8.0
step 4 : C:\ProgramData\ is a hidden folder and it can be shown by "Control Panel\Appearance and Personalization\show hidden files and folders\" and click always show hidden files,folders and click ok.
step 5 : Verify the installation
step 5.1 : Go to the path
"C:\ProgramData\NVIDIA Corporation\CUDA Samples\v8.0.61\bin\samples_vs2015"
Visual studio will be opened and in the right column find "device query" , right click and build in release mode. After that build "bandwidthtest".
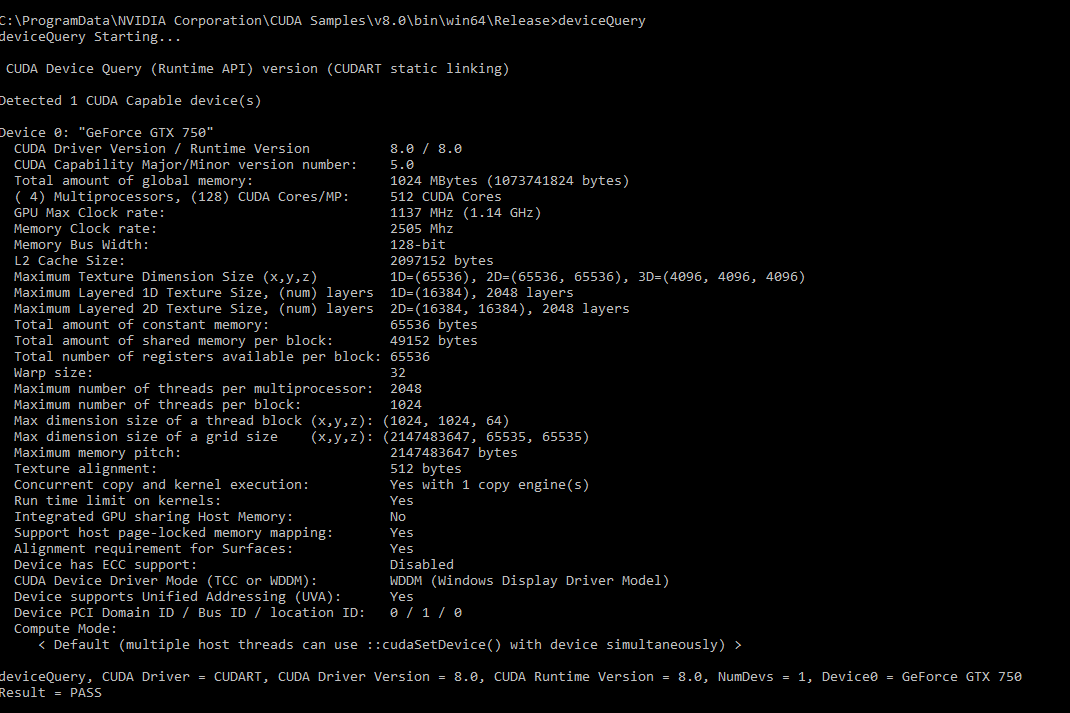
step 5.2 : "C:\ProgramData\NVIDIA Corporation\CUDA Samples\v8.0.61\bin\win64\Release\" Run devicequery.exe and you should a window as displayed in figure 1.
Note: open cmd prompt in admininstrator mode and type manually to run devicequery.
cd C:\ProgramData\NVIDIA Corporation\CUDA\Samples\v8.0\bin\win64\Release
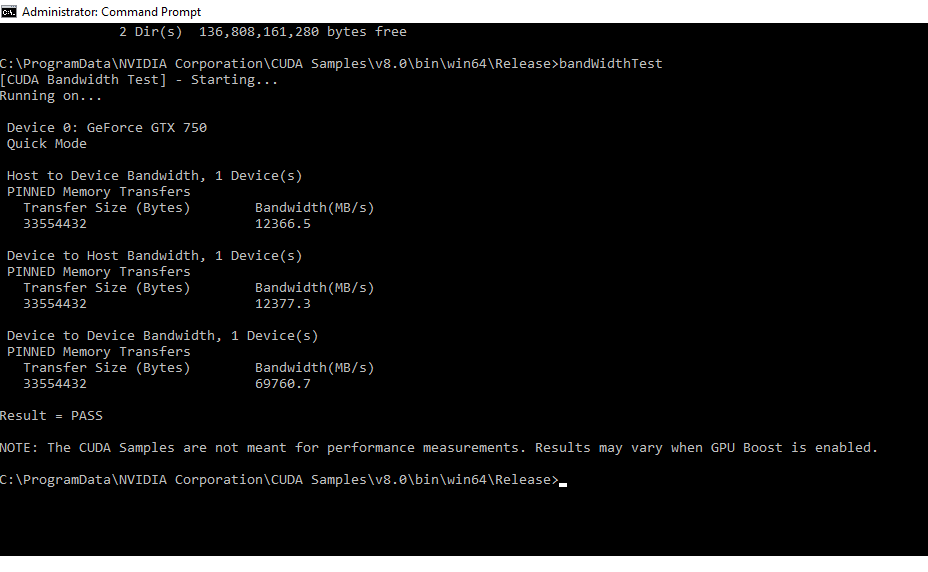
step 5.3 : run "bandwidthtest" in the same way and you should a window as displayed in figure 2.
1. Windows 10
2. Cuda capable GPU
3. Visual studio community 2015
4. NVIDIA GPU toolkit
Procedure:
step 1 : Verify you have CUDA capable GPU through display adapters section in the windows device manager. The windows device manager can be opened via "Run" command in the start menu and type "control /name Microsoft.DeviceManager".
step 2 : Download the NVIDIA toolkit (exe-local) and run the toolkit.
The CUDA toolkit installs the CUDA driver and tools needed to create, build and run a CUDA application as well as libraries, header files, CUDA samples source code, and other resources.
step 3 : read the release notes available in the path to know where the subpackages are installed.
C:\Program Files\NVIDIA GPU Computing Toolkit\CUDA\v8.0
step 4 : C:\ProgramData\ is a hidden folder and it can be shown by "Control Panel\Appearance and Personalization\show hidden files and folders\" and click always show hidden files,folders and click ok.
step 5 : Verify the installation
step 5.1 : Go to the path
"C:\ProgramData\NVIDIA Corporation\CUDA Samples\v8.0.61\bin\samples_vs2015"
Visual studio will be opened and in the right column find "device query" , right click and build in release mode. After that build "bandwidthtest".
step 5.2 : "C:\ProgramData\NVIDIA Corporation\CUDA Samples\v8.0.61\bin\win64\Release\" Run devicequery.exe and you should a window as displayed in figure 1.
Note: open cmd prompt in admininstrator mode and type manually to run devicequery.
cd C:\ProgramData\NVIDIA Corporation\CUDA\Samples\v8.0\bin\win64\Release
step 5.3 : run "bandwidthtest" in the same way and you should a window as displayed in figure 2.
step 6 : Compiling CUDA programs
"C:\ProgramData\NVIDIA Corporation\CUDA Samples\v8.0" open sample_vs2015.sln and build.
step 7 : Run any .exe program from the below path to make sure CUDA is installed properly.
"C:\ProgramData\NVIDIA Corporation\CUDA Samples\v8.0\bin\win64\Release"
step 8 : if your program runs, HURRAH!!! You have INSTALLED CUDA SUCCESSFULLY.
Reference
Install Opencv-3.2 using Microsoft visual studio
System Requirements:
Windows 10 -64 bit
Procedure:
Step 1: Install Microsoft visual studio - Professional 2015
Step 2: check whether the compiler works successfully.
1. File- New - Project
2. Select win32 console application. Go for default options.
3. Type in the following Program to verify that the compiler is installed without errors
#include "stdafx.h"
#include <iostream>
using namespace std;
int main()
{
cout << "Hello World\n";
system("pause");
return 0;
}
Step 3: Download Cmake tool.
Step 4: Install Tortoisegit
Step 5: Install Opencv from sourceforge or Github
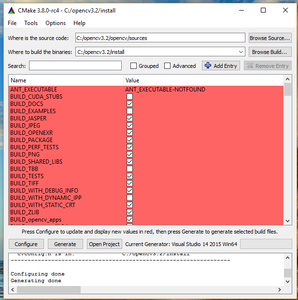
Step 6: Open cmake - bin - cmake-gui
1. where is the source code - C: opencv-3.2/opencv/sources
where to build the libraries - c: opencv-3.2/install
2. click configure
3. Choose default visual studio 2015 and click finish
4. At this point we can see a log being generated in the bottom box of cmake tool.
5. Finally click generate button to create new content with mybuild library.
Step 7: Compile opencv library using visual studio
1. go to opencv3.2 -install-opencv.sln and click on it to open with visual studio
2. At the top of the visual studio choose "release" or "debug"mode. In my case i chose "debug mode" first.
Windows 10 -64 bit
Procedure:
Step 1: Install Microsoft visual studio - Professional 2015
Step 2: check whether the compiler works successfully.
1. File- New - Project
2. Select win32 console application. Go for default options.
3. Type in the following Program to verify that the compiler is installed without errors
#include "stdafx.h"
#include <iostream>
using namespace std;
int main()
{
cout << "Hello World\n";
system("pause");
return 0;
}
Step 3: Download Cmake tool.
Step 4: Install Tortoisegit
Step 5: Install Opencv from sourceforge or Github
Step 6: Open cmake - bin - cmake-gui
1. where is the source code - C: opencv-3.2/opencv/sources
where to build the libraries - c: opencv-3.2/install
2. click configure
3. Choose default visual studio 2015 and click finish
4. At this point we can see a log being generated in the bottom box of cmake tool.
5. Finally click generate button to create new content with mybuild library.
Step 7: Compile opencv library using visual studio
1. go to opencv3.2 -install-opencv.sln and click on it to open with visual studio
2. At the top of the visual studio choose "release" or "debug"mode. In my case i chose "debug mode" first.
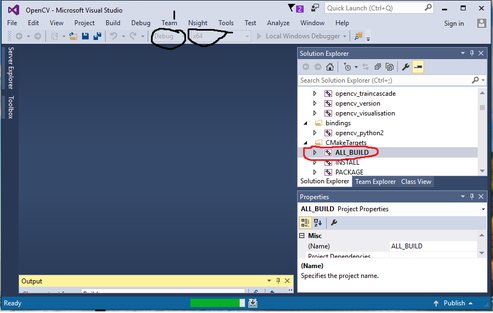
3. Right click on "All build" option and select build.
4. Repeat the process by changing from debug mode to release mode. right click on all build option and select build.
5. After both the sets of build is complete right click on install and build again. This will combine both the debug and release libraries "lib" and "bin" in one folder.
Reference
1. Dog feather design
2. Installation in windows
3. Build OpenCv with studio
